WayPoint 204
Ready to go?
Before you begin, remove the Dejero WayPoint 204 receiver and the 2 AC power cords from the package.
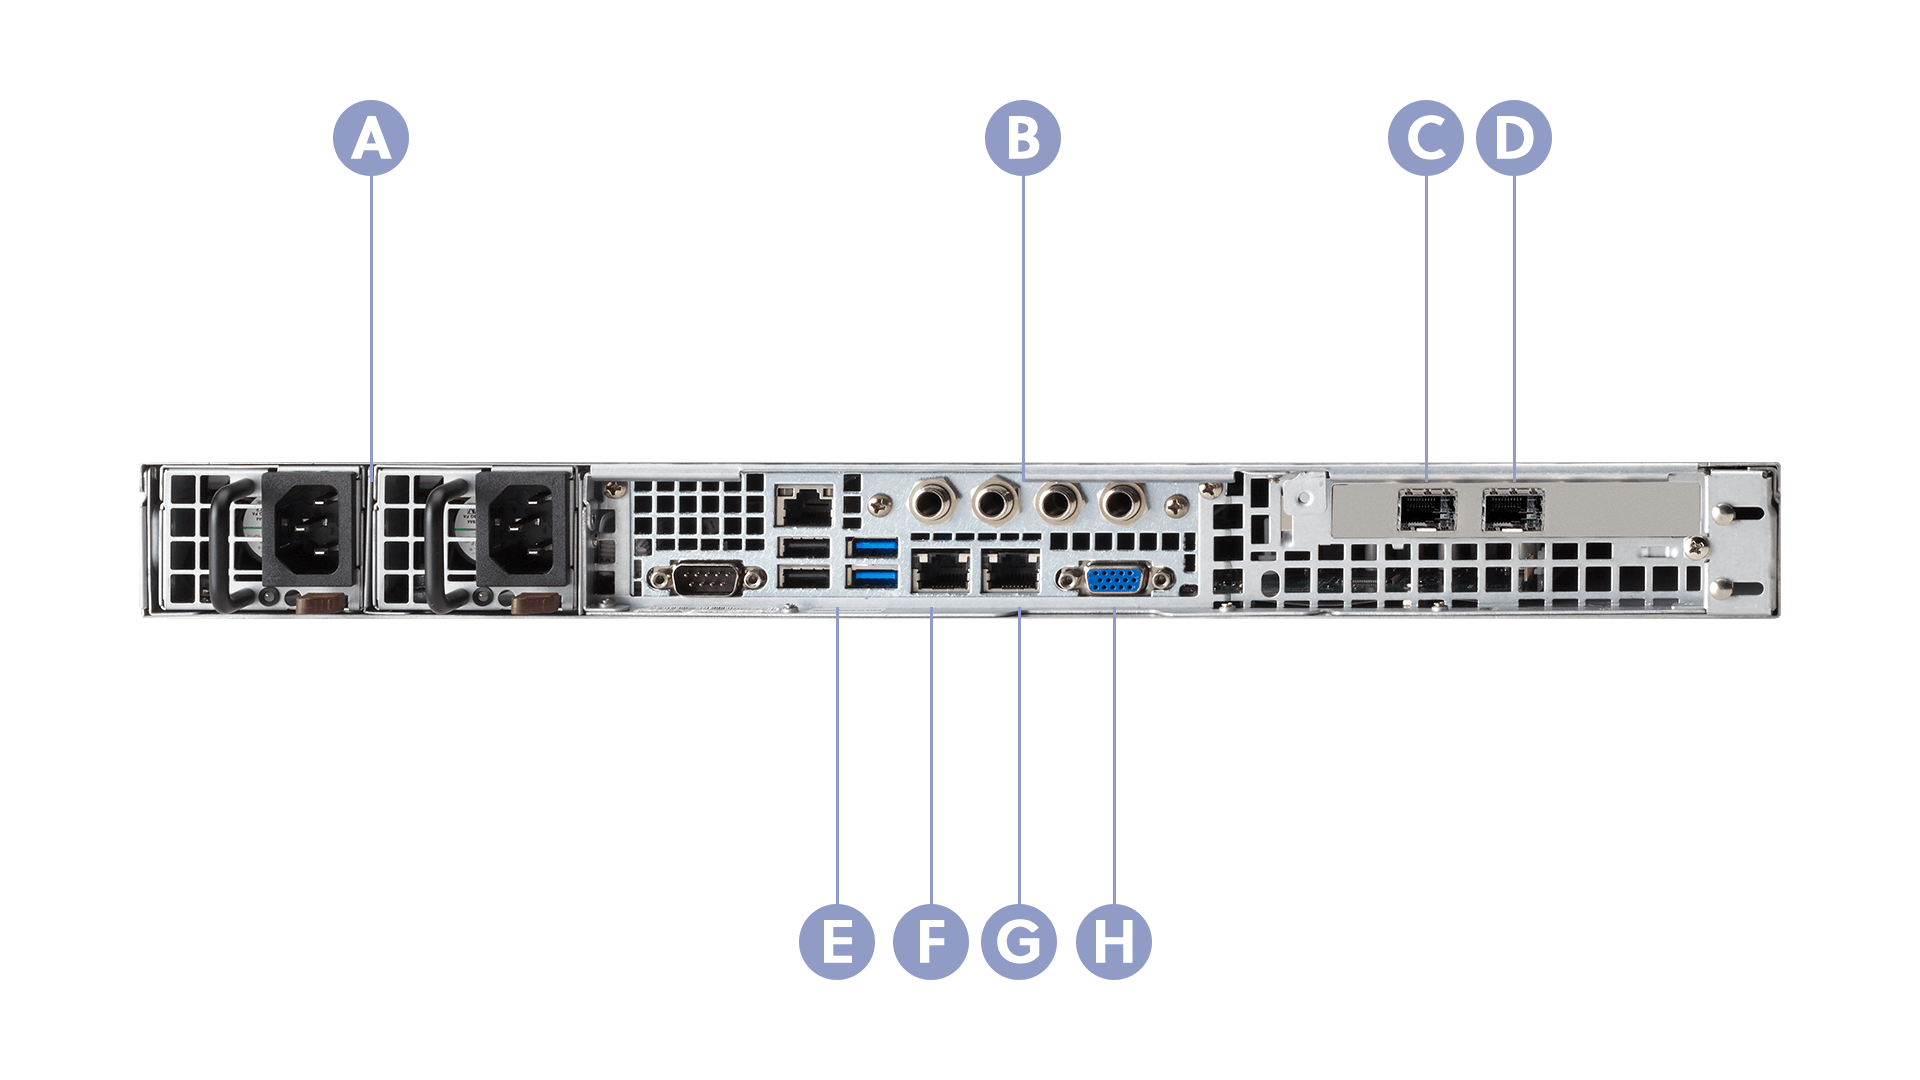
A. Power
B. IFB ports
C. SFP 2
D. SFP 1
E. USB ports
F. Ethernet port 2
G. Ethernet port 1
H. VGA port
Set up the WayPoint receiver
The WayPoint receiver is designed to fit directly into your rack-mount environment and connect seamlessly to your existing equipment. After it is installed, you use a web interface to configure and connect the receiver to your IP infrastructure. After configuration is complete, you can assign source transmitters, such as a Dejero EnGo to the receiver’s outputs using Dejero Control. The receiver can then receive live broadcasts from the transmitters.
- Rack mount the WayPoint receiver.
- Connect an Ethernet cable to Ethernet port 1 or Ethernet port 2 on the back of the receiver.
- Connect a monitor to the VGA port on the back of the receiver and a keyboard and mouse to the USB ports. Alternatively, you can connect these peripherals using a KVM switch.
- To use IFB, plug four ¼” mono TRS audio cables into the IFB 1, IFB 2, IFB 3, and IFB 4 input ports on the back of the receiver. You cannot use 1-piece straight adapters with no cable between TRS and XLR due to space constraints.
- Plug two SFP transceivers into the SFP 1 and SFP 2 ports on the back of the receiver.
- Plug in the two power cords. The receiver turns on.
Note: The WayPoint receiver uses balanced audio for IFB. You can attach TRS cables directly to the WayPoint receiver, or, if you have XLR infrastructure, you can use female XLR to male TRS adapter cables.
Ensure network connectivity
To ensure that your Dejero video transmission sources can communicate with the WayPoint, you must have:
- Internet connectivity to and from the receiver over a publicly-addressable IPv4 address.
- At least one DNS resolver that can resolve external hostnames and is accessible to the receiver.
- Sufficient connection bandwidth to support the desired number of concurrent live streams and file and clip transfers.
Note: Network address translation (NAT), port address translation (PAT), and proxy firewalls are only supported if the translation or proxying is completely transparent to the application layer.
In most cases, the WayPoint receiver is behind a network firewall. On your firewall, set up rules to allow the following:
- Outbound UDP and TCP packets sent on port 6001 and their corresponding stateful responses.
- Inbound UDP and TCP packets destined for port 6001 and their corresponding stateful responses. If PAT is required, use any port number as a listening port provided that the firewall forwards that port traffic to port 6001 on the WayPoint receiver.
- Outbound TCP packets from port 443 and their corresponding stateful responses.
- Outbound TCP packets from port 53 of the DNS resolver and their corresponding stateful responses.
Configure the WayPoint receiver
To configure the WayPoint receiver, you access the Network Config page on the receiver to set the type of IP connection, the IP address, subnet, and gateway for each connection. After configuring this information, you configure each output. For more information on configuring the outputs, visit support.dejero.com to read the Dejero WayPoint 204 User Guide.
By default, Ethernet port 1 is set up with a static IP address of 192.168.0.12 and Ethernet port 2 is set up with a static IP address of 192.168.0.13. You can configure this IP address to a different IP address or keep the static address and change it to match your network topology.
Open the Network Configuration page
- On the WayPoint receiver, open a browser.
- In the URL field, type http://192.168.0.12:8888/config.
- On the Sign In page, type the username and password provided by Dejero.
- Click Sign In.
The Network Config page appears.
Configure the network interface
Use the Network Config page to configure the destination for streams.
Warning: If you access the receiver remotely, when you configure the IP address, mask, or gateway of the Management Interface on the Network Config page, it adjusts the NIC interface of the operating system and can make the system unreachable.
- On the Network Config page, in the Port Number 1 or Port Number 2 section, perform the following actions:
- Set whether the IP address is static or dynamic.
- Specify the IP address, subnet, gateway, and interface metric.
- In the SFP 1 section, perform the following actions:
- Specify the IP address.
- Specify the subnet, gateway, and interface metric.
- In the SFP 2 section, repeat step 2 using the values for the second connection.
- Click Save.
Note: Depending on the type of configuration changes that you make, you might need to restart the receiver.
Need help?
You can find more support information on the SupportHub at support.dejero.com. If you require additional help, please contact support at support@dejero.com.
Technical Support:
support@dejero.com
US & Canada (Toll Free): 1 866 808 3665, ext 2
International: +1 519 772 4824, ext 2