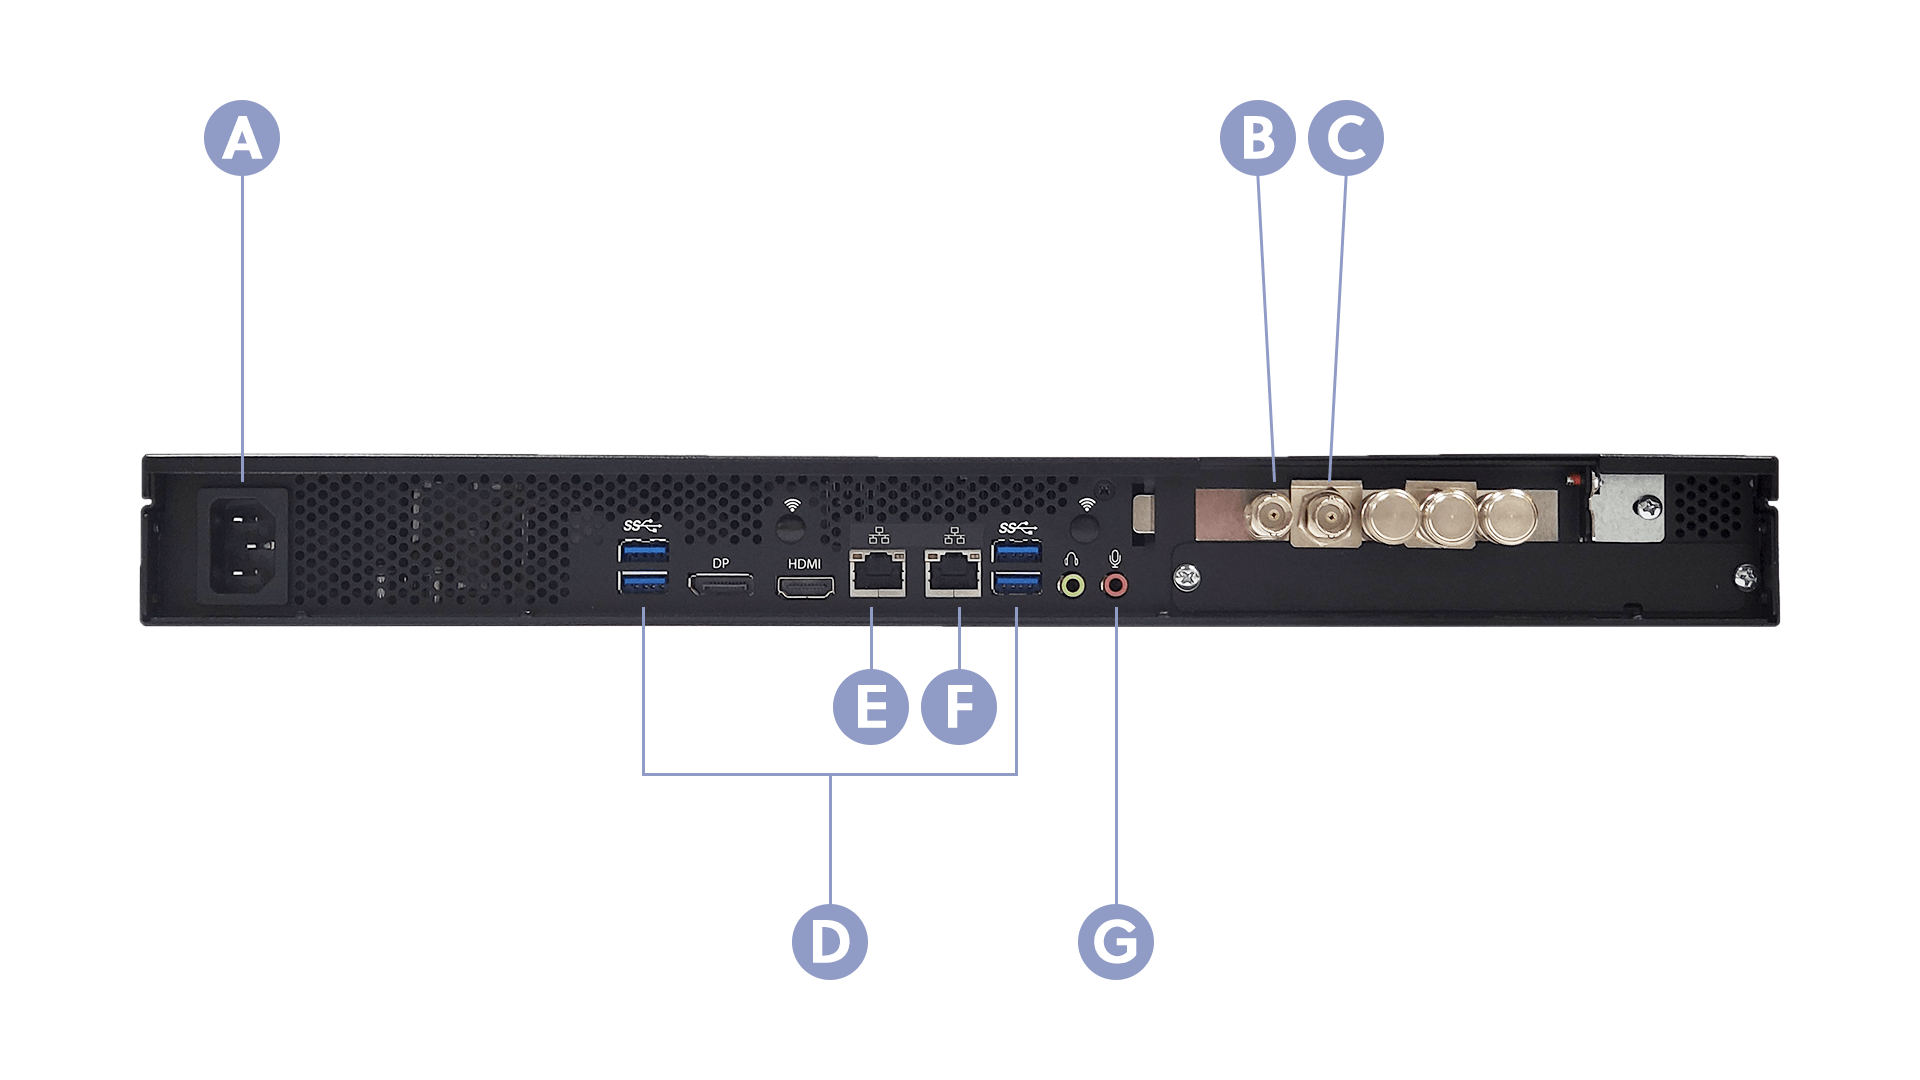
WayPoint 50
Ready to go?
Before you begin, remove the Dejero WayPoint 50 receiver and the AC power cord from the package.

A. Power
B. Ref In
C. SDI output
D. USB ports
E. Ethernet port 2
F. Ethernet port 1
G. IFB input
Set up the WayPoint receiver
- Rack mount the WayPoint receiver.
- Connect an Ethernet cable to the Ethernet port on the back of the receiver.
- If you are connecting the receiver to an additional Ethernet network for redundancy or for MPEG-TS IP output to an MPEG-TS decoder, connect an Ethernet cable to Ethernet port 2.
- Connect a monitor to the HDMI port or DisplayPort on the back of the receiver and a keyboard and mouse to the USB ports. Alternatively, you can connect these peripherals using a KVM switch.
- If necessary, perform the following actions:
- Plug your reference signal (genlock) input cable into the Ref In port on the back of the receiver.
- To use IFB, plug the 3.5 mm microphone cable into the IFB port on the back of the receiver. The left channel of the connected stereo 3.5 mm cable is captured and sent as the mono IFB source.
- Plug the SDI cable into the SDI 1 video output port on the back of the receiver.
- Plug in the power cord. The receiver turns on.
- After the receiver starts, at the login prompt, type dejero and press Enter.
Note: The left channel of the connected stereo 3.5 mm cable is captured and sent as the mono IFB source.
Ensure network connectivity
To ensure that your Dejero video transmission sources can communicate with WayPoint, you must have:
- Internet connectivity to and from the receiver over a publicly-addressable IPv4 address.
- At least one DNS resolver that can resolve external hostnames and is accessible to the receiver.
- Sufficient connection bandwidth to support the desired number of concurrent live streams and file and clip transfers.
Note: Network address translation (NAT), port address translation (PAT), and proxy firewalls are only supported if the translation or proxying is completely transparent to the application layer.
In most cases, the WayPoint receiver is behind a network firewall. On your firewall, set up rules to allow the following:
- Outbound UDP and TCP packets sent on port 6001 and their corresponding stateful responses.
- Inbound UDP and TCP packets destined for port 6001 and their corresponding stateful responses. If PAT is required, use any port number as a listening port provided that the firewall forwards that port traffic to port 6001 on the WayPoint receiver.
- Outbound TCP packets from port 443 and their corresponding stateful responses.
- Outbound TCP packets from port 53 of the DNS resolver and their corresponding stateful responses.
If you are using MPEG-TS to send video over IP to a decoder, the WayPoint receiver must reach the MPEG-TS decoder over an Ethernet port. Dejero recommends using a dedicated network for MPEG-TS traffic.
Configure the WayPoint receiver
Prerequisite: The WayPoint receiver requires an IPv4 IP address that does not change. You can configure a static IP address or use a DHCP reservation.
Configure a static IP address
- At the command prompt, type netsh interface ipv4 show config, and, if necessary, note the subnet mask, default gateway, and primary and secondary DNS for each Ethernet connection.
- Type netsh interface ipv4 set address “Ethernet” static <IPv4 address> <subnet mask> <gateway>. Use values for the IPv4 address, subnet mask, and gateway for the static IP address that you are assigning.
- If you are using Ethernet port 2, type netsh interface ipv4 set address “Ethernet 2” static <IPv4 address> <IPv4 subnet mask> < gateway IPv4 address>. Use values for the IPv4 address, subnet mask, and gateway for the static IP address that you are assigning.
- After the WayPoint reinitializes the network, type netsh interface ipv4 set dns “Ethernet” static <primarydns>. Use the primary DNS from step 1 or as required for your network.
- Type netsh interface ipv4 set dns “Ethernet” static <secondaryDNS> index=2. Use the secondary DNS from step 1 or as required for your network.
- If you are using Ethernet port 2, repeat steps 4 and 5 for the Ethernet 2 connection.
- Type netsh interface ipv4 show config to confirm that the IP address information is set correctly.
Use a DHCP reservation
- At the command prompt, type ipconfig /all.
- Record the physical address values for each Ethernet adapter.
- Specify those, as needed, in your network’s DHCP server configuration.
Configure the receiver in Dejero Control
After setting up the receiver, configure it in Control. For more information, visit support.dejero.com to read the Dejero WayPoint 50 User Guide.
Test receiver installation
Verify that the WayPoint receiver is installed correctly by using one of the following methods:
- In Control, beside the IP address field, click Check status.
- Using Control, assign a transmitter to the receiver output. Send a sample video to the receiver using a camera and source transmitter.
For more information on using Control, visit support.dejero.com to read the Dejero Control User Guide.
Need help?
You can find more support information on the SupportHub at support.dejero.com. If you require additional help, please contact support at support@dejero.com.
Technical Support:
support@dejero.com
US & Canada (Toll Free): 1 866 808 3665, ext 2
International: +1 519 772 4824, ext 2